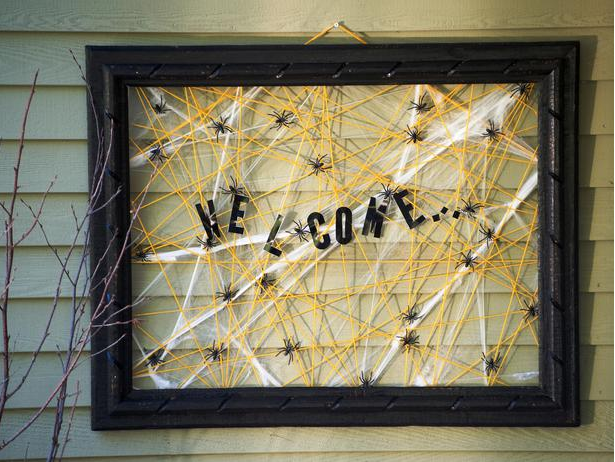
Transform your home into a site unseen with creepy crawling spiders and eerie tombs reminiscent of the dead with these easy DIY Halloween decorations.
Front Porch Welcome Sign
Simply take an old or thrifted frame and transform it into either a Halloween-themed welcome or unwelcome, depending on your taste, hanging alongside creepy spiders and their webs.

- Scissors
- Hammer
- Black paint and a paintbrush
- Large wood frame
- Small wire nails
- 4 to 8 felt furniture pads
- Small toy spiders
- White cotton spider webbing
- Yellow or orange yarn
- Black letters
- Picture hanging kit, if not already attached to frame
How to:
Paint frame black if not already.On the back along the edge, hammer in the small wire nails. Insert the nails so only about a 1/4″ is sticking out of the frame. Place the felt pads on the back of the frame along the corners so the nails will not scratch the house or door. Wrap the yarn on the wires going back and forth across the frame in a random pattern. Behind the yarn, stretch out some of the white cotton material along the same nails. Then place the letters in a random pattern onto the yarn to spell out your message. Finally, place the spiders along the front and tuck into the yarn and webbing.
Cheesecloth Spiderwebs
Droop creepy spiderwebs crafted from cheesecloth anywhere in your home; from doorways to the dining room table.

Tools and Materials:
- Measuring tape
- White or ivory cheesecloth
- Scissors
- Pushpins or adhesive hooks
- Plastic spiders
- White craft glue
How to:
Measure the area where you plan to hang the cheesecloth and cut the fabric to the width of that space. Pin or hook the cheesecloth into place. Cut vertical strips of cloth and vary the length of cuts and space between. Snip, tear and make holes in each strip and rub cheesecloth between hands to fray the edges for an eerie feeling. Attach plastic spiders to the tattered webbing with craft glue.
Frontyard Tombstones
Turn your frontyard into a gravesite as a lining of tombstones lead the way to your doorstep.
 Tools and Materials:
- Tombstone Template
- Epitaph Templates
- Gray paper bags, 12 by 15 inches
- Cutting mat
- Craft knife
- Sponge applicator
- Craft paint, in black
- Cardboard, cut to fit bottom of bag
- Garden stakes, 4 inches
- LED tea lights
- Print the tombstone and epitaph templates. Place template on top of a bag, and trace around the top edge. Cut along that line to create stone shape. Tape epitaph template to cutting mat, and use craft knife to cut out letters to make a stencil.
- Place epitaph stencil on the bag you just cut. Using sponge, dab with craft paint to transfer letters. Let dry. Open bag, and insert cardboard piece to reinforce the bottom. Place in desired spot, and drive garden stakes through the bottom of the bag into the ground. Add lights, about 3 per bag.
Glittered Pumpkin Centerpiece
Arrange synthetic pumpkins on a tiered cake stand and add gothic candlesticks and black candles draped in those homemade cheesecloth spider webs for one haunting centerpiece.
 Tools and Materials:
- Synthetic pumpkins of assorted sizes
- Ultrafine black and silver glitter
- Tiered cake stands
- Black paint
- Paintbrush
- Tacky glue
- Bowl
- Tray or plate
- Artificial spiders (optional)
- ‘Dusty Miller’ foliage (optional)
How to:
To decorate the pumpkins, first paint them black, then apply tacky glue to half of each pumpkin using a paintbrush. Hold pumpkin over a bowl filled with glitter. Spoon glitter over glued surface, making certain the glitter falls into all the crevices and sockets, and any excess lands back in the bowl. Place on a plate or tray and let dry for at least 1 hour. Tap or brush off any excess glitter. Repeat gluing and glittering on uncoated surface of each pumpkin until completely covered, and touch up other areas as needed.
Sources: Martha Stewart, diynetwork.com


